
10 Responsive Design Mistakes That Quietly Ruin Your Site (and How to Avoid Them)
Stop repeating responsive design mistakes that damage mobile UX, Core Web Vitals, SEO, and critical conversion rates forever.

Figma is a breath of fresh air for people involved in interface design. Its browser-based nature allows everyone to access this design tool from any operating system. Hence, it allows people to do collaborative real-time work on the same file or project without exporting. Just share the link then you can collaborate. Of course, to get the most out of it, you need to be very familiar with Figma tools.

Although Figma is basically beginner-friendly and easy to use, knowing the tools is always better than knowing nothing. You may find that some tools are familiar since they are also available in other design software, apps, or tools. Nevertheless, it never hurts to learn. Here are some basic tools you have to know to make your experience in using Figma more enjoyable.
Every device or medium has a different size. The frame is a tool to get design results that match that size. It allows you to choose which part of the canvas to create the design. Moreover, you can create a more complex design since Figma enables you to nest frames within frames. Click the tool in the toolbar at the top of the screen to activate it. You also can press F or A from the keyboard as a shortcut.
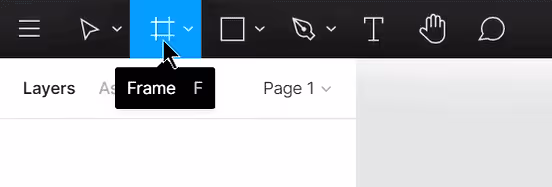
Once you activate the frame, you can just click on the canvas to have a default 100 x 100 dimension size. Click and drag on the canvas to have a custom dimension. Or, you can choose the size from the presets for the popular devices or assets. Once you have frames on the canvas, you will activate extra functions, such as layout grids, auto layout, constraints, and prototyping.
To create a consistent design across platforms and devices that are well-aligned, you need to use layout grids. This Figma tool will appear once you have frames on the canvas. Thus, you can only apply it to frames, including components. Once activated, the layout grid setting will appear on the right side screen.

Layout grids have three types, grid, column, and row, which are in a uniform square, and each has a different function. Their uniformity can let you define grids’ sizes and colors. Square grids are best for precise design, like symbols or icons. Meanwhile, column and row grids are ideal for responsive interface designs, like for web and mobile needs. Although they can be used separately, they also can be combined to create more complex designs.
The shape tool is a must-available tool for every design software. It can help a designer to create a more creative and attractive design. You can access this Figma tool via the toolbar next to the frame tool. This tool provides you with various basic shapes, from a rectangle, line, arrow, ellipse, and polygon, to a star shape. You only have to click the preferred shape from the list to get the shape you need.

Making sure all the elements in your design are aligned and neat is a must. If your design project has one or two less aligned elements, it can affect the whole design, aesthetically and functionally. This alignment tool can help you ensure the position of the elements you use are in the position you need. Figma provides six alignments you can choose from the properties panel. Or, you can use the shortcut from the keyboard.
Alt + A = Align LeftAlt + W = Align TopAlt + H = Align Horizontal CenterAlt + V = Align Vertical CenterAlt + D = Align RightAlt + S = Align Bottom

Sometimes, you may find that the element or frame you have is too big or too small. When it happens, you can resize it. there are two ways you can do it. First, use your mouse to move the cursor. Drag the corner to get the right size. To keep the same aspect ratio, you can hold Shift. To keep the same alignment, you only need to hold Option so it will resize from the center of the layer.
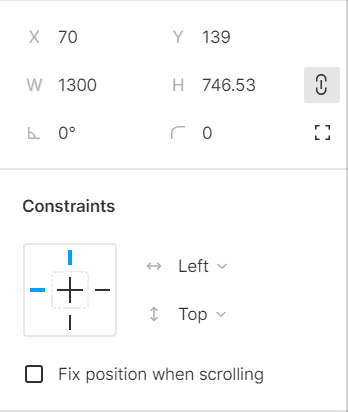
The second way you can use to change the size is through the properties panel. You only need to change the width (W) and height (H) values of the layer. Click the Constrain Proportion option to keep it scales proportionally.
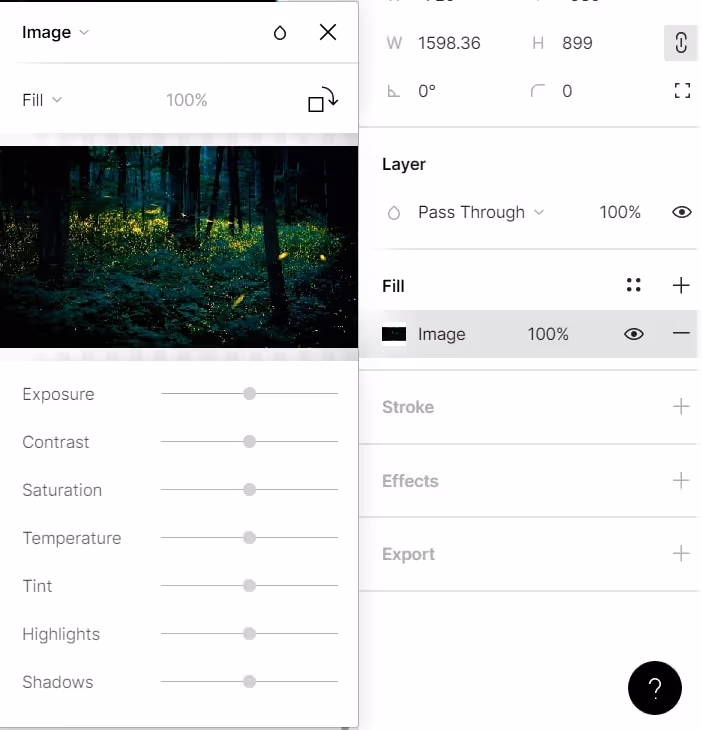
No more other tools to edit the image because Figma allows you to edit and adjust the image you need right after importing. You can edit the exposure, contrast, saturation, temperature, tint, and more from this tool. Using this Figma tool can let you have the image with the right tone just as you need it.
Color is matter. The color picker can help you pick the color you use on the design. Change the color by clicking the color wheel, using the eye-dropping tool, inputting the color HEX code, or choosing from the preset. As other design tools offer, you can adjust the color opacity from the color setting.
If you find that solid color is not your color, Figma provides the gradient option. Combine multiple colors to get what you want. Adjust the gradient direction and the opacity in the same setting panel of the color picker.


Figma is invaluable for designers. It offers a myriad of features. These streamline the design process. They also enable seamless collaboration. Mastering the basics of Figma tools is the key. Users can unlock their creative potential. Stunning, tailored designs become achievable. Whether creating interfaces or tweaking images, Figma helps. Its intuitive, browser-based platform is a game-changer. Creative visions come to life effortlessly.